1. MVC, MVP, and MVVM are some of the common patterns to guide programmers toward creating decoupled solutions. 
    The software behaviors that are common to MVC, MVP, and MVVM are: 

    1)Data Layer / Business Logic (Model): This is the behavior which applies the business logic to the application's data. A Domain Model usually represents the Model where the objects are used to mimic the real world entities. 
    2) Presentation Layer / UI ( View ): View is responsible for the visual presentation of the application. This behavior displays model information to the user. 
    3) Application Logic ( Controller, Presentation or ViewModel ): This behavior holds the logic that implements the interaction between the model and the view. 

    MVC 

    1)MVC consists of three layers Model, View, and Controller. 
    2) MVC is a compound pattern 
    3) It uses a Front Controller pattern that processes Web application requests through a single controller. This enables you to design an application that supports a rich routing infrastructure. 
    4)It does not use view state or server-based forms. This makes the MVC framework ideal for developers who want full control over the behavior of an application. 
    5)It provides better support for test-driven development (TDD). 
    6)It works well for Web applications that are supported by large teams of developers and for Web designers who need a high degree of control over the application behavior. 

    MVC Steps 

    Step 1: Incoming request directed to Controller. 
    Step 2: Controller processes request and forms a data Model. 
    Step 3: Model is passed to View. 
    Step 4: View transforms Model into appropriate output format. 
    Step 5: Response is rendered. 
    Example:- 
    Please refer below link 
    http://www.codeproject.com/Articles/79577/A-Simple-Tutorial-on-Developing-ASP-NET-Applicatio 

    MVP 

    1)1)MVP consists of three layers Model, View, and Presenter. 
    2)In MVP, View and Model are more loosely coupled, providing a clearer separation of concerns. 
    3)MVP, View is responsible for delegating the user input to the Presenter. 
    4)MVP, Presenter and View should have a 1-1 relation, with each View having a reference to its Presenter through the interface. 
    5)MVP, view binds to the Model directly through data binding. 
    6)In MVP, unit testing is easier, as View knows Presenter through an interface which can easily be mocked. 

    Example:- 
    Please refer this link 
    http://www.c-sharpcorner.com/uploadfile/john_charles/model-view-presenter-mvp-design-pattern-and-data-binding/ 

    MVVM 

    1)MVVM pattern is a one of the best solutions to handle such problems for WPF and Silverlight application. 
    2)When you use MVVM pattern for WPF, Silverlight the view wouldn't have the typical event handlers that's so common in UI code. 
    3)MVVM provides a clear separation between the UI and application logic. 
    4))The MVVM pattern includes three key parts: 

    1)Model (Business rule, data access, model classes) 
    2)View (User interface (XAML)) 
    3)ViewModel (Agent or middle man between view and model) 
    Example:- 
    Please refer this link 
    http://msdn.microsoft.com/en-us/library/gg405484%28v=pandp.40%29.aspx
    0

    Add a comment


  2. Introduction

    Elements of a WPF user interface are hierarchically related. This relation is called the LogicalTree. The template of one element consists of multiple visual elements. This tree is called the VisualTree. WPF differs between those two trees, because for some problems you only need the logical elements and for other problems you want all elements.
     
    <Window>
        <Grid>
            <Label Content="Label" />
            <Button Content="Button" />
        </Grid>
    </Window>


    Why do we need two different kind of trees?

    A WPF control consists of multiple, more primitive controls. A button - for example - consists of a border, a rectangle and a content presenter. These controls are visual children of the button.
    When WPF renders the button, the element itself has no appearance, but it iterates through the visual tree and renders the visual children of it. This hierarchical relation can also be used to do hit-testing, layout etc.
    But sometimes you are not interested in the borders and rectangles of a controls' template. Particulary because the template can be replaced, and so you should not relate on the visual tree structure! Because of that you want a more robust tree that only contains the "real" controls - and not all the template parts. And that is the eligibility for the logical tree.

    The Logical Tree

    The logical tree describes the relations between elements of the user interface. The logical tree is responsible for:
    • Inherit DependencyProperty values
    • Resolving DynamicResources references
    • Looking up element names for bindings
    • Forwaring RoutedEvents

    The Visual Tree

    The visual tree contains all logical elements including all visual elements of the template of each element.
    The visual tree is responsible for:
    • Rendering visual elements
    • Propagate element opacity
    • Propagate Layout- and RenderTransforms
    • Propagate the IsEnabled property.
    • Do Hit-Testing
    • RelativeSource (FindAncestor)

    Programmatically Find an Ancestor in the Visual Tree

    If you are a child element of a user interface and you want to access data from a parent element, but you don't know how many levels up that elemens is, it's the best solution to navigate up the tree until it finds an element of the requested type.
    This helper does excactly this. You can use almost the same code to navigate through the logical tree.
     
    public static class VisualTreeHelperExtensions
    {
        public static T FindAncestor<T>(DependencyObject dependencyObject)
            where T : class
        {
            DependencyObject target = dependencyObject;
            do
            {
                target = VisualTreeHelper.GetParent(target);
            }
            while (target != null && !(target is T));
            return target as T;
        }
    }
     
     
    The following example shows how to use the helper. It starts at this and navigates up the visual tree until it finds an element of type Grid. If the helper reaches the root element of the tree, it returns null.
     
    var grid = VisualTreeHelperExtensions.FindAncestor<Grid>(this);
     
    0

    Add a comment


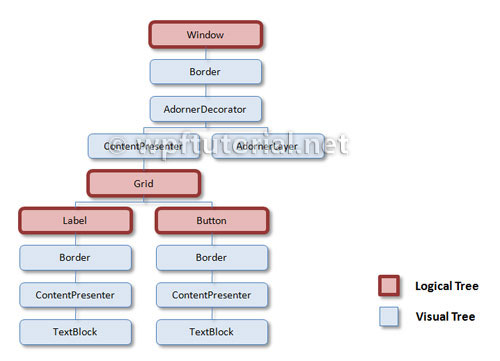
  3. Routed events are events which navigate up or down the visual tree acording to their RoutingStrategy. The routing strategy can be bubble, tunnel or direct. You can hook up event handlers on the element that raises the event or also on other elements above or below it by using the attached event syntax: Button.Click="Button_Click".
    Routed events normally appear as pair. The first is a tunneling event called PreviewMouseDown and the second is the bubbling called MouseDown. They don't stop routing if the reach an event handler. To stop routing then you have to set e.Handled = true;
    • Tunneling The event is raised on the root element and navigates down to the visual tree until it reaches the source element or until the tunneling is stopped by marking the event as handeld. By naming convention it is called Preview... and appears before corresponding bubbling event.

    • Bubbling The event is raised on the source element and navigates up to the visual tree until it reaches the root element or until the bubbling is stopped by marking the event as handled. The bubbling event is raised after the tunneling event.

    • Direct The event is raised on the source element and must be handled on the source element itself. This behavior is the same as normal .NET events.


    How to Create a Custom Routed Event


    // Register the routed event
    public static readonly RoutedEvent SelectedEvent = 
        EventManager.RegisterRoutedEvent( "Selected", RoutingStrategy.Bubble, 
        typeof(RoutedEventHandler), typeof(MyCustomControl));
     
    // .NET wrapper
    public event RoutedEventHandler Selected
    {
        add { AddHandler(SelectedEvent, value); } 
        remove { RemoveHandler(SelectedEvent, value); }
    }
     
    // Raise the routed event "selected"
    RaiseEvent(new RoutedEventArgs(MyCustomControl.SelectedEvent));
    0

    Add a comment


  4. What are dependency properties? The quick definition from the MSDN docs says that a dependency property is a "property that is backed by the WPF property system." Not really a great one-line explanation, but really, I can't blame them. I can't come up with a good one line explanation either. But essentially, it gives you a bunch of infrastructure to do all the things that you often want to do with a normal property - validate it, coerce it into a proper range, give out change notifications, and a number of other aspects. We aren't going to touch on everything that a dependency property can do today - because there is a lot. But we will be talking about how to use them, how to create them, and how to set up validation/coercion/change notification.
    So one of the first things I thought was weird about the definition of a dependency property is that it is a static. This didn't make sense to me at first - this property needs to store info relevant to a particular instance of a class, how is it going to do that if it is static? But then, as I read more about them, I realized that a dependency property definition was exactly that - a definition. You are essentially saying that class A will have a property B - and it makes sense that that definition would be static. The actual storage of a value for a dependency property is deep inside the WPF property system - you never have to worry about it.
    One thing you do have to note, though, is that for a class to contain dependency properties, it has to in some way derive from DependencyObject. In deriving from this class, you get all the infrastructure needed to participate in the WPF dependency property system.
    So at first glance, all the properties on the new WPF controls seem to be regular old properties. But don't be fooled - this is often just a simple wrapper around a dependency property (and the documentation will usually say this). So what does it mean for a property to be a simple wrapper around a dependency property? Lets look at the FrameworkElement.Height property as an example:
    public double Height
    { 
      get 
      { 
        return (double)GetValue(HeightProperty); 
      }
      set 
      { 
        SetValue(HeightProperty, value); 
      }
    } 
    Your first two questions are probably "What are these GetValue and SetValue functions?" and "What is this HeightProperty?", and those are very good questions indeed. Well, GetValue and SetValue are functions you get by deriving from DependencyObject. They allow you, as you might have guessed, to get and set the values of dependency properties. The HeightProperty is the dependency property itself - the static definition part of the FrameworkElement class.
    So far, this is just added complexity, and you're wondering why there is yet another level of indirection on things. But here is where things get interesting. In the "old ways", to set up some sort of change notification on the Height property here, you would have had to override it in a new class deriving from this FrameworkElement class and added whatever you needed in the 'set' part of the property here. However, you no longer have to do things like that. Instead, you can:
    FrameworkElement myElement;
    
    //
    // myElement gets set to an element
    //
    
    DependencyPropertyDescriptor dpd;
    dpd = DependencyPropertyDescriptor.FromProperty(
        FrameworkElement.HeightProperty, typeof(FrameworkElement))
    
    dpd.AddValueChanged(myElement, myHeightChangedFunction); 
    And now you have a function that will get called any time the height changes on myElement! I think that is pretty handy. You can detach the hook just as easily:
    DependencyPropertyDescriptor dpd;
    dpd = DependencyPropertyDescriptor.FromProperty(
        FrameworkElement.HeightProperty, typeof(FrameworkElement))
    
    dpd.RemoveValueChanged(myElement, myHeightChangedFunction);
    Ok, enough about other people's dependency properties - lets go make our own! Below we have a extremely simple class with a dependency property for "LastName", as well as a property wrapper around it:
    public class Person : DependencyObject
    {
      public static readonly DependencyProperty LastNameProperty = 
          DependencyProperty.Register("LastName", typeof(string), typeof(Person));
    
      public string LastName
      {
        get
        {
          return (string)GetValue(LastNameProperty);
        }
        set
        {
          SetValue(LastNameProperty, value);
        }
      }
    }
    The Register call is pretty simple - you give the property a name (in this case "LastName"), you say what type of information the property will hold (in this case a string), and you say what type of object this property is attached to (in this case Person). A little verbose, especially when you add in the property wrapper, but not too bad. And I'm sure Microsoft will find a way to streamline the syntax in the next version of C#.
    A little bit of a side note here - don't ever put anything but the GetValue and SetValue calls inside the property wrapper. This is because you never know if someone will set the property through the wrapper, or straight through a SetValue call - so you don't want to put any extra logic in the property wrapper. For example, when you set the value of a dependency property in XAML, it will not use the property wrapper - it will hit the SetValue call directly, bypassing anything that you happened to put in the property wrapper.
    Back to creating dependency properties. The constructor for Register has a couple more optional arguments. And we are going to jump right in and use them all!
    public class Person : DependencyObject
    {
      public static readonly DependencyProperty LastNameProperty =
          DependencyProperty.Register("LastName", typeof(string), typeof(Person), 
          new PropertyMetadata("No Name", LastNameChangedCallback, LastNameCoerceCallback), 
          LastNameValidateCallback);
    
      private static void LastNameChangedCallback(
          DependencyObject obj, DependencyPropertyChangedEventArgs e) 
      {
        Console.WriteLine(e.OldValue + " " + e.NewValue);
      }
    
      private static object LastNameCoerceCallback(DependencyObject obj, object o) 
      {
        string s = o as string;
        if (s.Length > 8)
          s = s.Substring(0, 8);
        return s;
      }
    
      private static bool LastNameValidateCallback(object value)
      {
        return value != null;
      }
    
      public string LastName
      {
        get
        {
          return (string)GetValue(LastNameProperty);
        }
        set
        {
          SetValue(LastNameProperty, value);
        }
      }
    }
    The two other arguments to Register are a PropertyMetadata instance and a validateValueCallback. There are a couple different classes that derive from PropertyMetadata, but today we are just using the base one. The PropertyMetadata instance allows us to set a default value (in this case "No Name"), a property changed callback (LastNameChangedCallback), and a coerce value callback (LastNameCoerceCallback). The default value does exactly what you might expect. The change callback can do whatever you want it to do, and you have plenty of information with which to do it. The DependencyPropertyChangedEventArgs contain both the old and the new values of the property, as well as a reference to what property was changed. And the DependencyObject passed in is the object on which the property was changed. This is needed because, as you can see, this method is static. So every time the "LastName" property is changed on any object, this function will get called.
    The same goes for the coerce callback - we get the object on which the property is being changed, and the possible new value. Here we get the opportunity to change the value - in this case, apparently last names are forced to be 8 characters or less.
    And finally, we have the LastNameValidateCallback. This just gets the possible new value, and returns true or false. If it returns false, an exception is blown - so in this case, if anyone ever tries to set a null last name, they better watch out.
    So there you go, the basics on dependency property usage and creation. There are a couple areas I haven't covered - inheritance, attached properties, and overriding metadata to name a few. But hopefully this gets off on the right foot with respect to dependency properties, and I'll probably write a tutorial in the next few weeks on those other areas.
    0

    Add a comment


  5. How can we make a deep copy of a WPF object?


    We can make a deep copy of a WPF object using XamlWriter and XamlReader. Here the XamlWriter.Save is used to serialize the contents of a WPF object into xaml string. XamlReader.Load is used to parse XAML string into a WPF object. To make deep copy of an wpf UIelement , you can use the following method. 

    1: public UIElement DeepCopy(UIElement element)
    2: {
    3: string shapestring = XamlWriter.Save(element);
     4: StringReader stringReader = new StringReader(shapestring);
    5: XmlTextReader xmlTextReader = new XmlTextReader(stringReader);
    6: UIElement DeepCopyobject = (UIElement)XamlReader.Load(xmlTextReader);
    7: return DeepCopyobject;
    8: }

    If you would like to make deep copy of WPF objects without XamlWriter, you have to use reflection .For that you have to navigate recursively inside the type to get all Dependency Properties and Dependency Objects as well as plain .net properties
    0

    Add a comment


    1. Create a primary key on each table you create and unless you are really knowledgeable enough to figure out a better plan, make it the clustered index (note that if you set the primary key in Enterprise Manager it will cluster it by default).
    2. Create an index on any column that is a foreign key. If you know it will be unique, set the flag to force the index to be unique.
    3. Don’t index anything else (yet).
    4. Unless you need a different behaviour, always owner qualify your objects when you reference them in TSQL. Use dbo.sysdatabases instead of just sysdatabases.
    5. Use set nocount on at the top of each stored procedure (and set nocount off) at the bottom.
    6. Think hard about locking. If you’re not writing banking software, would it matter that you take a chance on a dirty read? You can use the NOLOCK hint, but it’s often easier to use SET TRANSACTION ISOLATION LEVEL READ UNCOMMITTED at the top of the procedure, then reset to READ COMMITTED at the bottom.
    7. I know you’ve heard it a million times, but only return the columns and the rows you need.
    8. Use transactions when appropriate, but allow zero user interaction while the transaction is in progress. I try to do all my transactions inside a stored procedure.
    9. Avoid temp tables as much as you can, but if you need a temp table, create it explicitly using Create Table #temp.
    10. Avoid NOT IN, instead use a left outer join – even though it’s often easier to visualize the NOT IN.
    11. If you insist on using dynamic sql (executing a concatenated string), use named parameters and sp_executesql (rather than EXEC) so you have a chance of reusing the query plan. While it’s simplistic to say that stored procedures are always the right answer, it’s also close enough that you won’t go wrong using them.
    12. Get in the habit of profiling your code before and after each change. While you should keep in mind the depth of the change, if you see more than a 10-15% increase in CPU, Reads, or Writes it probably needs to be reviewed.
    13. Look for every possible way to reduce the number of round trips to the server. Returning multiple resultsets is one way to do this.
    14. Avoid index and join hints.
    15. When you’re done coding, set Profiler to monitor statements from your machine only, then run through the application from start to finish once. Take a look at the number of reads and writes, and the number of calls to the server. See anything that looks unusual? It’s not uncommon to see calls to procedures that are no longer used, or to see duplicate calls. Impress your DBA by asking him to review those results with you.
    0

    Add a comment


  6. More than a year ago, I wrote how to kill all the processes running in SQL Server. Just a day ago, I found the quickest way to kill the processes of SQL Server. While searching online I found very similar methods to my previous method everywhere. Today in this article, I will write the quickest way to achieve the same goal.
    Read here for older method of using cursor – SQL SERVER – Cursor to Kill All Process in Database.
    USE master;GOALTER DATABASE AdventureWorksSET SINGLE_USERWITH ROLLBACK IMMEDIATE;ALTER DATABASE AdventureWorksSET MULTI_USER;GO
    Running above script will give following result.
    Nonqualified transactions are being rolled back. Estimated rollback completion: 100%.
    0

    Add a comment


  7. One of the most frequent question in an interview for a Junior/Graduate Developer role is ‘What is the difference between Abstract class and Interface?’. I have to admit that (as a Graduate) I thought this was not a good question to gauge my skill as a developer. I thought my intrepidness or whatever that skill I thought I had was far more important than being able to answer the difference between abstract and interface. A couple of promotions later, I am sitting at the other end of the table. Having the responsibility of asking that same question, I can start to see to why we need to know the answer. To know the difference between the two, a developer must think about abstraction and encapsulation; the two paradigm that Object Oriented Programming heavily relies on in modelling reality. Without inheritance and interfaces, we are stuck with complex trees of conditions, iterations and recursions that is probably duplicated again and again to describe a similar characteristic between two entities. 
    This post will discuss the difference between abstract and interface, along with an (awesome!!!) example – better than you’ve seen elsewhere. Abstract class:
    • cannot be instantiated.
    • is a special type of class in which you can have members without implementation.
    • as we know in C#/VB/Java, a class can only inherit from 1 class. This also applies for Abstract Class.
    • normally used for framework-type library classes: providing default behavior for some of its class members, but forcing the developer to implement others.
    • is believed to be faster in JavaHOWEVER I cannot find the same claim in .Net. The speed difference is *probably* negligible and only relevant to the most academic field.
    • the aim: making sure something is *eventually* implemented.
    • A class can inherit an abstract class without implementing all its abstract method. However only a class that has all its method implemented can be instantiated to an object.
    • IS-A relationship.
    • e.g. Student IS A Person, Employee IS A Person.
    // 'framework library' for a person
    // a person can enrol and submit
    // however, the class that consume this framework library
    // need to provide 'where' the paperwork need to be sent
    public abstract Person
    {
        public abstract SendPaperWork(string paperwork)
    
        public void Enrol()
        {
            SendPaperWork("enrolment");
        }
    
        public void Submit()
        {
            SendPaperWork("report");
        }
    }
    
    // by inheriting Person abstract class
    // we are enabling student to enrol and submit
    // however, SendPaperWork need to be implemented
    // because we need to tell it explicitly 'where' 
    // to send the enrolment/ submission
    public class Student : Person
    {
        public override SendPaperWork(string paperwork)
        {
            School.Send(paperwork);
        }
    }
    
    // an employee send the paperwork to a different 'place' than student
    public class Employee : Person
    {
        public override SendPaperWork(string paperwork)
        {
            Company.Send(paperwork);
        }
    }
    Interface:
    • cannot be instantiated.
    • is a special type of abstract class in which all the members do not have any implementations.
    • enables polymorphism. A class can implement more than 1 Interfaces.
    • normally used for application classes: providing contract for ensuring interactibility.
    • the aim: making sure something is interchangeable.
    • A class that implements an Interface need to contain all the implementation, otherwise the compiler will throw an error.
    • CAN-DO relationship.
    • e.g. Student CAN enrol, Student CAN submit assignment.
    public interface ICanEnrol
    {
        void Enrol();
    }
    
    public interface ICanSubmit
    {
        void Submit();
    }
    
    public class Student : ICanEnrol, ICanSubmit
    {
        public void Enrol()
        {
            School.Send("enrolment");
        }
    
        public void Submit()
        {
            School.Send("report");
        }
    }
    
    public class Employee : ICanEnrol, ICanSubmit
    {
        public void Enrol()
        {
            Company.Send("enrolment");
        }
    
        public void Submit()
        {
            Company.Send("report");
        }
    }
    
    public class MailServer
    {
        public void SendAllSubmissions()
        {
            // AllSubmitters is a collection of students and employees
            foreach (ICanSubmit submitter in AllSubmitters)
            {
                // The MailServer does not care if 
                // the submitter is a student
                // or an employee, as long as it can submit
                submitter.Submit()
            }
        }
    }
    0

    Add a comment


  8. Abstraction problems of methods and functions
     

    Before we move ahead and we talk about delegates let’s try to understand what problem does delegate solve. Below is a simple class named ‘ClsMaths’ which has a simple ‘Add’ function. This class ‘ClsMaths’ is consumed by a simple UI client. Now let’s say over a period of time you add subtraction functionality to the ‘ClsMaths’ class, your client need to change accordingly to accommodate the new functionality.
    In other words addition of new functionality in the class leads to recompiling of your UI client.
     
    In short the problem is that there is a tight coupling of function names with the UI client. So how can we solve this problem?. Rather than referring to the actual methods in the UI / client if we can refer an abstract pointer which in turn refers to the methods then we can decouple the functions from UI.
    Later any change in the class ‘ClsMath’ will not affect the UI as the changes will be decoupled by the Abstract pointer. This abstract pointer can be defined by using delegates. Delegates define a simple abstract pointer to the function / method.
     
    Ok, now that we have understood the tight coupling problem and also the solution, let’s try to understand how we can define a simple delegate.
     

    How to declare a delegate?
     

    To implement a delegate is a four step process declare, create, point and invoke.
     
    The first step is to declare the delegate with the same return type and input parameters. For instance the below function ‘add’ has two input integer parameters and one integer output parameter.
    private int Add(int i,int y)
    {
    return i + y;
    }


    So for the above method the delegate needs to be defined in the follow manner below. Please see the delegate keyword attached with the code.
     
    // Declare delegate
    public delegate int PointetoAddFunction(int i,int y);
    

    The return type and input type of the delegate needs to be compatible, in case they are not compatible it will show the below error as shown in the image below.
     

    The next step (second step) is to create a delegate reference.
     
    // Create delegate reference
    PointetoAddFunction myptr = null;
    
    The third step is to point the delegate reference to the method, currently we need to point the delegate reference to the add function.
     
    // Point the reference to the add method
    myptr = this.Add;
    

    Finally we need to invoke the delegate function using the “Invoke” function of the delegate.
     
    // Invoke the delegate
    myptr.Invoke(20, 10)
    
    Below figure sums up how the above four step are map with the code snippet.
     

    Solving the abstract pointer problem using delegates 
     

    In order to decouple the algorithm changes we can expose all the below arithmetic function through an abstract delegate.
     
    So the first step is to add a generic delegate which gives one output and takes two inputs as shown in the below code snippet.
    public class clsMaths
    {
    public delegate int PointerMaths(int i, int y);
    }
    

    The next step is to expose a function which takes in operation and exposes an attached delegate to the UI as shown in the below code snippet.
     
    public class clsMaths
    {
    public delegate int PointerMaths(int i, int y);
    
    public PointerMaths getPointer(int intoperation)
    {
    PointerMaths objpointer = null;
    if (intoperation == 1)
    {
    objpointer = Add;
    }
    else if (intoperation == 2)
    {
    objpointer = Sub;
    }
    else if (intoperation == 3)
    {
    objpointer = Multi;
    }
    else if (intoperation == 4)
    {
    objpointer = Div;
    }
    return objpointer;
    }
    }
    

    Below is how the complete code snippet looks like. All the algorithm functions i.e. ‘Add’ , ‘Sub’ etc are made private and only one generic abstract delegate pointer is exposed which can be used to invoke these algorithm function.
     
    public class clsMaths
    {
    public delegate int PointerMaths(int i, int y);
    
    public PointerMaths getPointer(int intoperation)
    {
    PointerMaths objpointer = null;
    if (intoperation == 1)
    {
    objpointer = Add;
    }
    else if (intoperation == 2)
    {
    objpointer = Sub;
    }
    else if (intoperation == 3)
    {
    objpointer = Multi;
    }
    else if (intoperation == 4)
    {
    objpointer = Div;
    }
    return objpointer;
    }
    
    private int Add(int i, int y)
    {
    return i + y;
    }
    private int Sub(int i, int y)
    {
    return i - y;
    }
    private int Multi(int i, int y)
    {
    return i * y;
    }
    private int Div(int i, int y)
    {
    return i / y;
    }
    }
    

    So at the client side the calls becomes generic without any coupling with the actual method names like ‘Add’ , ‘Sub’ etc.
     
    int intResult = objMath.getPointer(intOPeration).Invoke(intNumber1,intNumber2);
    

    Multicast delegates
     

    In our previous example we have see how we can create a delegate pointer to a function or method. We can also create a delegate which can point to multiple functions and methods. If we invoke such delegate it will invoke all the methods and functions associated with the same one after another sequentially.
    Below is the code snippet which attaches 2 methods i.e. method1 and method2 with delegate ‘delegateptr’. In order to add multiple methods and function we need to use ‘+=’ symbols. Now if we invoke the delegate it will invoke ‘Method1’ first and then ‘Method2’. Invocation happen in the same sequence as the attachment is done.
     
    // Associate method1
    delegateptr += Method1;
    // Associate Method2
    delegateptr += Method2;
    // Invoke the Method1 and Method2 sequentially
    delegateptr.Invoke();
    

    So how we can use multicast delegate in actual projects. Many times we want to create publisher / subscriber kind of model. For instance in an application we can have various error logging routine and as soon as error happens in a application you would like to broadcast the errors to the respective components.
     

    Simple demonstration of multicast delegates
     

    In order to understand multicast delegates better let’s do the below demo. In this demo we have ‘Form1’, ‘Form2’ and ‘Form3’. ‘Form1’ has a multicast delegate which will propagate event to ‘Form2’ and ‘Form3’.
     
    At the form level of ‘Form1’ (this form will be propagating events to form2 and form3) we will first define a simple delegate and reference of the delegate as shown in the code snippet below. This delegate will be responsible for broadcasting events to the other forms.
     
    // Create a simple delegate
    public delegate void CallEveryOne();
    
    // Create a reference to the delegate
    public CallEveryOne ptrcall=null;
    // Create objects of both forms
    
    public Form2 obj= new Form2();
    public Form3 obj1= new Form3();
    

    In the form load we invoke the forms and attach ‘CallMe’ method which is present in both the forms in a multicast fashion ( += ).
     
    private void Form1_Load(object sender, EventArgs e)
    {
    // Show both the forms
    obj.Show();
    obj1.Show();
    // Attach the form methods where you will make call back
    ptrcall += obj.CallMe;
    ptrcall += obj1.CallMe;
    }
    

    Finally we can invoke and broadcast method calls to both the forms.
     
    private void button1_Click(object sender, EventArgs e)
    {
    // Invoke the delegate
    ptrcall.Invoke();
    }
    

    Problem with multicast delegates – naked exposure
     

    The first problem with above code is that the subscribers (form2 and form3) do not have the rights to say that they are interested or not interested in the events. It’s all decided by ‘form1’.
    We can go other route i.e. pass the delegate to the subscribers and let them attach their methods if they wish to subscribe to the broadcast sent by ‘form1’. But that leads to a different set of problems i.e. encapsulation violation.
    If we expose the delegate to the subscriber he can invoke delegate, add his own functions etc. In other words the delegate is completely naked to the subscriber.
     

    Events – Encapsulation on delegates
     

    Events help to solve the delegate encapsulation problem. Events sit on top of delegates and provide encapsulation so that the destination source can only listen and not have full control of the delegate object.
    Below figure shows how the things look like:-
    • Method and functions are abstracted /encapsulated using delegates
    • Delegates are further extended to provide broadcasting model by using multicast delegate.
    • Multicast delegate are further encapsulated using events.
     

    Implementing events
     

    So let’s take the same example which we did using multicast delegates and try to implement the same using events. Event uses delegate internally as event provides higher level of encapsulation over delegates.
    So the first step in the publisher (‘Form1’) we need to define the delegate and the event for the delegate. Below is the code snippet for the same and please do notice the ‘event’ keyword.
    We have defined a delegate ‘CallEveryOne’ and we have specified an event object for the delegate called as ‘EventCallEveryOne’.
     
    public delegate void CallEveryone();
    public event CallEveryone EventCallEveryOne;
    

    From the publisher i.e. ‘Form1’ create ‘Form2’ and ‘Form3’ objects and attach the current ‘Form1’ object so that ‘Form2’ and ‘Form3’ will listen to the events. Once the object is attached raise the events.
     
    Form2 obj = new Form2();
    obj.obj = this;
    Form3 obj1 = new Form3();
    obj1.obj = this;
    obj.Show();
    obj1.Show();
    EventCallEveryOne();
    

    At the subscriber side i.e. (Form2 and Form3) attach the method to the event listener.
     
    obj.EventCallEveryOne += Callme;
    

    This code will show the same results as we have got from multicast delegate example.
     

    Difference between delegates and events
     

    So what’s really the difference between delegates and events other than the sugar coated syntax of events. As already demonstrated previously the main difference is that event provides one more level of encapsulation over delegates.
    So when we pass delegates it’s naked and the destination / subscriber can modify the delegate. When we use events the destination can only listen to it.
     

    Delegates for Asynchronous method calls
     

    One of the other uses of delegates is asynchronous method calls. You can call methods and functions pointed by delegate asynchronously.
    Asynchronous calling means the client calls the delegate and the control is returned back immediately for further execution. The delegate runs in parallel to the main caller. When the delegate has finished doing his work he makes a call back to the caller intimating that the function / subroutine has completed executing.
     
    To invoke a delegate asynchronously we need call the ‘begininvoke’ method. In the ‘begininvoke’ method we need to specify the call back method which is ‘CallbackMethod’ currently.
     
    delegateptr.BeginInvoke(new AsyncCallback(CallbackMethod), delegateptr);
    

    Below is the code snippet for ‘CallbackMethod’. This method will be called once the delegate finishes his task.
     
    static void CallbackMethod(IAsyncResult result)
    {
    int returnValue = flusher.EndInvoke(result);
    }
    

    Summarizing Use of delegates
     

    There are 6 important uses of delegates:-
    1. Abstract and encapsulate a method (Anonymous invocation)
    This is the most important use of delegates; it helps us to define an abstract pointer which can point to methods and functions. The same abstract delegate can be later used to point to that type of functions and methods. In the previous section we have shown a simple example of a maths class. Later addition of new algorithm functions does not affect the UI code.

    2. Callback mechanismMany times we would like to provide a call back mechanism. Delegates can be passed to the destination and destination can use the same delegate pointer to make callbacks.

    3. Asynchronous processingBy using ‘BeginInvoke’ and ‘EndInvoke’ we can call delegates asynchronously. In our previous section we have explained the same in detail.

    4. Multicasting - Sequential processing Some time we would like to call some methods in a sequential manner which can be done by using multicast delegate. This is already explained in the multicast example shown above.

    5. Events - Publisher subscriber modelWe can use events to create a pure publisher / subscriber model.
     

    Difference between delegates and C++ pointer
     

    C++ pointers are not type safe, in other words it can point to any type of method. On the other hand delegates are type safe. A delegate which is point to a return type of int cannot point to a return type of string.
    0

    Add a comment


  9. Reasons To Upgrade (Worded For Management)
    1. Upgrading to 2008 will give an additional 3 years of support. So you’re looking at 7-8 years of support as opposed to 4-5 years on 2005. Source: founder of SQL Server Central. http://www.sqlservercentral.com/articles/Administration/3094/
    2. SQL 2005 SSIS – Buggy and has major shortcomings. Any enhancements for SSIS 2005 are halted.
      http://ayende.com/Blog/archive/2007/07/15/SSIS-15-Faults.aspx
      • Cannot create a global class in a project (i.e. – you have to re-write code everywhere)
      • CLR Framework is only a subset (Does not support External Assemblies or COM Interop)
      • DataTypes for transformations do not automatically map (have to manually be mapped using the mouse)
      • It is very hard to debug a package
      • Built-in logging displays tons of useless information and very little useful information
      • Difficult to find out specific information on the record-level about why an error occurred
      • Limited data types available in their flat-file connectors
      • Data flow tasks cannot include logical conditional flows like the process flows.
      • Script editors use VB.Net only (…my opinion)
      • Overall, just very sensitive and annoying.
    3. SSAS – Being a complete re-write, the 2005 Analysis services is less mature. Performance enhancements have been made in 2008. Personal experience has shown many errors when aggregating cubes and slower than expected on-the-fly aggregations than in SQL 2000 AS.
    4. Auditing – SQL 2008 implements auditing out of the box and functions asynchronously not hindering performance. Using SQL 2005 we will have to manually write auditing functionality or go third party. Depending on future auditing requirements, performance potentially can be impacted.
    5. Resource governor – SQL 2008 provides the ability to limit the resources of queries. This often happens with reporting procedures. Limiting the resources of non application centric resources will help end-user experience.
    6. Performance Data Collection – collect historical snapshots of system performance in a separate database
    7. Reporting Services – 2005 reporting services is very resource intensive and is not practical unless on a separate installation of SQL Server to perform report pagination/rendering. 2008 Reporting services is a rewrite of the reporting engine. http://www.microsoft.com/sqlserver/2008/en/us/wp-sql-2008-performance-scale.aspx
    8. Full text search – This is now integrated into the SQL Server engine and performance has been enhanced. http://www.microsoft.com/sqlserver/2008/en/us/wp-sql-2008-performance-scale.aspx
    9. Change Data Capture – For requirements to save or monitor historical information on changed data. Using SQL 2008 we can implement a non-invasive detection of changed records.
    10. CPU’s can be added on the fly
    11. Ability to compress data and use less disk space
    Reasons For Developers
Loading